Practical Tips to Prevent Concrete Segregation During Pouring
Explore practical tips to prevent concrete segregation during pouring, ensuring quality and durability in construction. Learn about causes, methods, and best practices.
Practical Tips to Prevent Concrete Segregation During Pouring
August 3, 2026
Concrete segregation during pouring can significantly undermine the quality and longevity of structures if not addressed promptly. This phenomenon, characterized by the separation of the cement paste from the aggregates, leads to local strength loss, honeycombing, and increased permeability, which accelerates the corrosion of reinforcements. A systematic approach, starting from mix selection to placement, can effectively mitigate these risks, resulting in homogeneous and durable concrete.
How to Identify Segregation During Pouring?
Segregation can sometimes be observed immediately during the discharge process. Signs include isolated gravel on the surface, shiny areas where laitance accumulates, or distinctly more liquid sections near denser elements. These indicators suggest a lack of homogeneity in the mix and should alert the team.
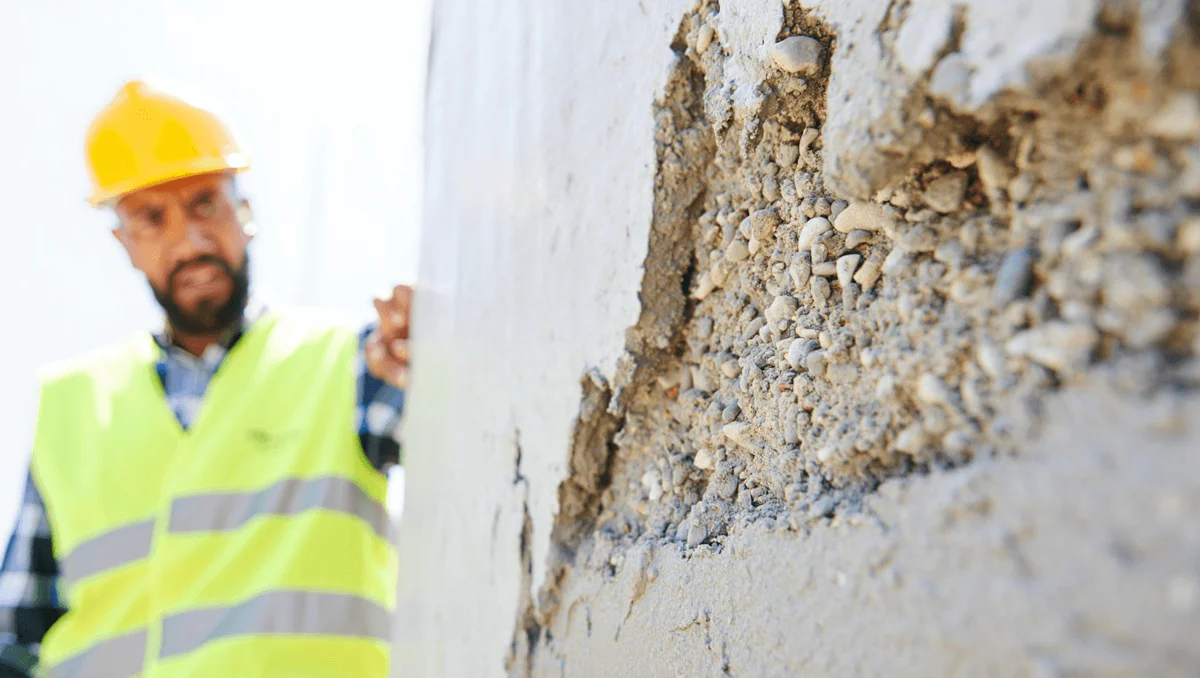
After formwork removal, symptoms often become more apparent and critical. Visible cavities, exposed gravel nests, or poorly encased reinforcements indicate a separation of components. These defects diminish local mechanical strength and facilitate the ingress of water or aggressive agents.
It is important to differentiate segregation from mere bleeding. Bleeding refers to the upward movement of water to the surface, while segregation involves a true separation of aggregates and paste. A quick visual inspection after pouring can often help identify the cause and limit its impact.
What Are the Most Common Causes of Separation?
Formulation errors are the leading culprits behind segregation. An excess of water alters the water-cement ratio, weakening the paste that binds the aggregates, thus encouraging the descent of heavier particles. Poorly graded or dirty aggregates exacerbate the situation by preventing proper encasement.
Site conditions also play a crucial role. Prolonged transport, excessive drop height, or inappropriate vibration can cause separation, even with a well-prepared concrete mix. Weather and work organization directly influence the occurrence of defects.
What Role Do Water, Consistency, and Additives Play?
The consistency of concrete determines its workability and stability during pouring. An excessively high slump class makes the mix fluid, facilitating the migration of aggregates. Operators should verify this characteristic upon receipt.
Adding water on-site is a frequent temptation but can be costly. This practice alters the water-cement ratio and promotes segregation. Using a plasticizer or superplasticizer is a safer alternative to enhance workability without diluting the paste.
Proper dosage of additives requires adherence to supplier recommendations and monitoring of effects in real situations. Overdosage can also destabilize the mix and lead to bleeding or separation phenomena.
How to Choose and Distribute Aggregates?
The gradation of aggregates significantly influences the cohesion of concrete. A continuous gradation curve facilitates encasement and reduces voids between grains, whereas a uniform batch encourages the descent of larger stones. The cleanliness of aggregates is crucial since impurities can hinder adhesion.
When reinforcements are dense, the maximum size of aggregates must be adapted to the spacing. A stone that cannot pass will block and create areas poor in mortar alongside accumulations. Ensuring compatibility between the geometry of the structure and the concrete formulation helps prevent such issues.
What Drop Height and Discharge Method Minimize Segregation?
A high drop height accelerates aggregates and causes them to separate upon impact. In many cases, using a chute, plunge tube, skip, or pump allows for placement without excessive shock. These devices control the flow and reduce risk.
Pouring in regular layers proves more effective than mass deposition in one spot. Moving concrete over long distances with a shovel or rake promotes separation, while multiple discharge points ensure a more uniform distribution. Reinforcements should be navigated with appropriate guidance to avoid aggregate congestion.
Constant logistical monitoring enhances process safety. Clear planning helps avoid downtime that encourages on-site mix modifications, thus limiting improvisational interventions that often lead to segregation.
What Vibration Method Reduces Segregation?
Vibration aims to eliminate air and ensure the encasement of reinforcements without disorganizing the mix. A vibrating needle should be inserted vertically and at regular intervals; it must remain in place only long enough to expel bubbles. A too-quick withdrawal or excessive horizontal movement encourages the rise of laitance.
Excessive vibration has the opposite effect. The liquid element accumulates at the surface, aggregates sink, and the concrete weakens. A trained operator can identify the balance point where bubbles diminish and the surface becomes shiny without excess laitance.
What Checks Should Be Made During Transport and Placement?
Transport gradually alters the consistency. A mixer maintains controlled mixing, but excessive or violent mixing can harm certain formulations. A pump requires proper priming, pressure, and pipe diameter to avoid jolts and separation.
Upon delivery, verifying the order slip, manufacturing time, slump class, and general appearance of the concrete helps anticipate problems. If the appearance seems abnormal, it is better to refuse improvised modifications and seek technical recommendations. These checks preserve the quality of the pour.
Good Practices to Adopt Before and During Pouring
Prevention involves a set of simple and complementary actions that enhance the stability of the mix. Thorough preparation of the site and discharge methods significantly reduces the risk of segregation and improves the durability of structures.
- Order concrete suitable for the structure and method of placement.
- Refuse uncontrolled water addition and prioritize additives when necessary.
- Limit drop height and use guiding devices for discharge.
- Pour in layers and multiply discharge points rather than moving concrete over long distances.
- Vibrate just enough with an appropriate needle and a trained operator.
The table below assists in selecting a slump class based on common building usage. It remains indicative and should always be confirmed by project specifications and supplier guidelines.
| Usage Type | Slump Class (mm) | Remarks | |---------------------------|------------------|--------------------------------------------------| | Foundations, footings | 0–40 | Firm consistency, low segregation risk | | Narrow columns, walls | 40–80 | Check aggregate size according to reinforcement | | Slabs, floors | 60–120 | Required workability, use additives if necessary | | Self-compacting concrete | No classic slump | Specific formulation, strict control of additives |
Corrective interventions vary depending on the extent of the defect and the accessibility of the affected area. For localized issues, a controlled reapplication of fresh concrete may suffice; for structural damage, specialized diagnosis becomes necessary. The primary goal remains the preservation of the integrity of the constructed element.